Making a Strong Jammer with the ESP8266 Arduino to Protect Your Wi-Fi
Wi-Fi technology has proliferated in our daily lives in recent years. Wi-Fi is essential to our ability to access the internet, communicate with our gadgets, and maintain relationships with friends and family. But as Wi-Fi has become more widely used, there has also been an increase in cyberattacks and Wi-Fi hacking. This blog post will demonstrate how to use an ESP8266 microcontroller, often known as a Daughter, to create a potent Wi-Fi jammer.
What is a WiFi Deauther/Jammer?
By transmitting de-authentication (Deauth) frames to the targeted devices, a Wi-Fi jammer often referred to as a Deauther, can interfere with the Wi-Fi connection between a network and a device. Deauthentication is the process that makes the devices disconnect from the network. The Deauther can be used in several ways, such as to test the security of a network, disable devices linked to it, and clog up its communication channels.
What is the ESP8266?
The highly integrated Wi-Fi chip ESP8266 makes it possible for embedded devices to connect to the internet. It is a well-liked option for IoT projects because it is a low-cost Wi-Fi module with a complete TCP/IP stack and microcontroller capability. You may create a variety of Wi-Fi applications, such as Wi-Fi Jammers/Daughters, with the ESP8266.

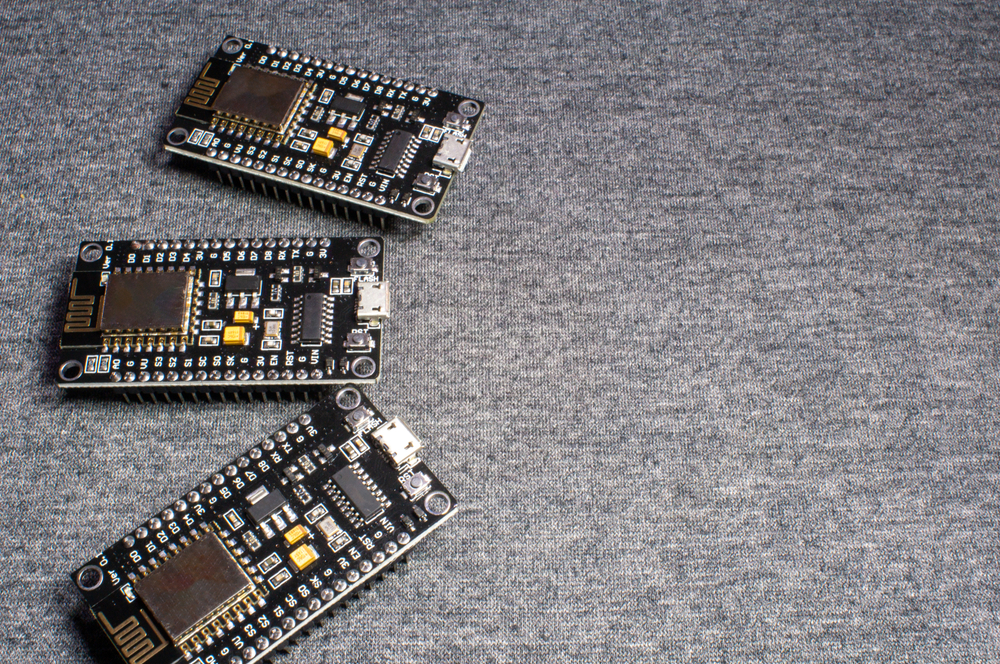
ESP8266 Wi-Fi Jammer/Deauther Construction
With an ESP8266, creating a Wi-Fi jammer is quite simple. Before moving on, it’s crucial to understand that it is unlawful and unethical to use a Wi-Fi jammer for malevolent purposes. You should only use this for educational and testing reasons, as we strongly suggest. So with that said, let’s get started.
Hardware Prerequisites
With an ESP8266, you may create a Wi-Fi jammer by using the following parts:
a development board for the ESP8266, such as the NodeMCU or Wemos D1 Mini
USB connectivity for the power source
A laptop or computer to program the ESP8266. A Wi-Fi antenna.
software specifications
Arduino IDE library for ESP8266
ESP8266 Deauther Firmware ESP8266 Sketch Data Upload Tool
Step 1: Install the Arduino IDE and ESP8266 Library.
Installing the Arduino IDE and the ESP8266 library is the first step. Both the ESP8266 library and the Arduino IDE are available for download from their respective websites. Install the Arduino IDE and the ESP8266 library after downloading them by following the directions on the web pages for each program.

Step 2: Uploading Sketch Data
The data from the sketch must then be uploaded to the ESP8266. The ESP8266 Sketch Data Upload Tool must be installed to accomplish this. Open the Arduino IDE after installation, then select Sketch > Include Library > Manage Libraries. Install the “ESP8266 Sketch Data Upload” library by searching for it. To access the tool after installation, go to Tools > ESP8266 Sketch Data Upload. Choose the “data” folder from the Deauther firmware by clicking “Select Sketch” and selecting it.

Step 3: Uploading Deauther Firmware is step three.
The ESP8266 must then be updated with the Deauther firmware. Extract the Deauther firmware files to a location on your computer after downloading them from GitHub. Go to File > Open in the Arduino IDE after starting it up. From the Deauther firmware, select the “esp8266 daughter” file.

Step 4: Experimenting with the gadget
1. Use the onboard micro USB connector to connect the module to a power source, or just turn on the switch if you’ve connected a battery as I have.
2. A WiFi network called pwned will be posted as soon as the module is connected. You must use a phone or laptop to connect to this WiFi network and type the password daughter.
3. Once the device is linked, launch an internet browser and go to “IP address”, which is the primary page from which you can manage anything.
4. Choose the WiFi network you wish to break into now.
5. Choose the kind of assault you wish to launch by going to the attack tab and choosing:

6. CONGO! The system is operating as it should.


2 comments
Great article, totally what I wanted to find.